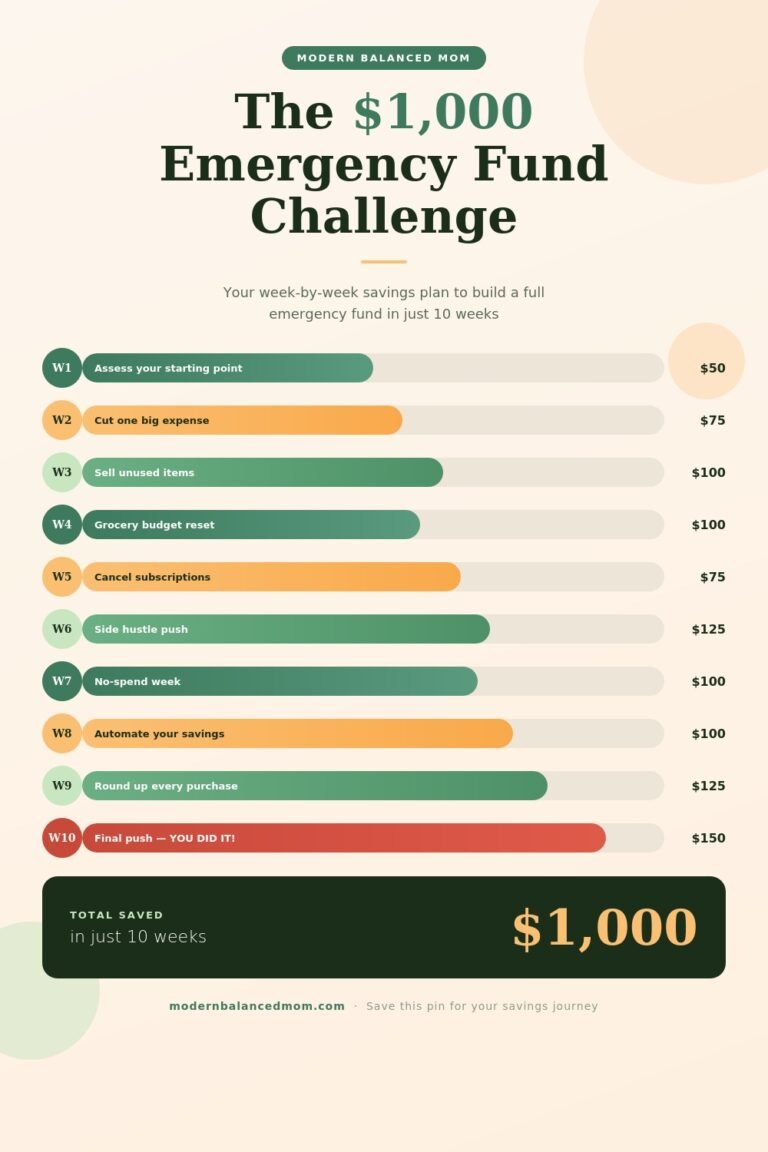
The Busy Mom’s Guide to Automating Your Finances in Under 30 Minutes
You’re juggling work deadlines, school pickups, dinner prep, and bedtime routines. The last thing you have energy for at the end of the day is manually tracking every dollar you spend or transferring money between accounts. But here’s the truth: you don’t have to choose between financial stability and your sanity.
What if I told you that you could set up a “set and forget budget” that runs itself while you focus on everything else demanding your attention? That’s exactly what financial automation does—it puts your money on autopilot so you can stop worrying and start living.
In this guide, I’m going to walk you through a simple, step-by-step process to automate finances in less than 30 minutes. No complicated spreadsheets. No finance degree required. Just practical systems that work for real moms with real lives.
Let’s take back control of your money—without adding one more thing to your mental load.
Why Automating Your Finances Changes Everything
Before we dive into the how, let’s talk about why this matters. When you automate your finances, you’re not just saving time—you’re creating a system that protects your family’s financial future without requiring constant attention.
The Mental Load Problem
As moms, we carry an invisible burden: remembering everything. Doctor’s appointments, permission slips, grocery lists, bill due dates—it’s exhausting. Financial automation removes money management from your mental checklist. You set it up once, and your finances run themselves.
The Benefits of Budgeting for Moms Through Automation
Here’s what happens when you automate:
- Bills get paid on time (no more late fees or panicked scrambling)
- Savings happen automatically (you’re building wealth without thinking about it)
- Debt gets paid down faster (consistent extra payments add up)
- Spending stays in check (when savings are removed first, you can’t overspend)
- Financial stress decreases (you know your system is working, even when you’re not)
The goal isn’t perfection—it’s progress. And automation is the fastest way to make consistent progress, even during your busiest seasons.

What You’ll Need Before You Start
This isn’t complicated, but you do need a few basics in place. Don’t worry—most of you already have these things.
Essential Accounts
- A checking account where your income lands
- A savings account (even if the balance is currently zero)
- Access to online banking for both accounts
- Your regular bills list (rent/mortgage, utilities, insurance, etc.)
Optional But Helpful
- A budgeting app (we’ll cover free options)
- A credit card you pay off monthly (for cashback rewards)
- A separate “fun money” account (helps prevent overspending)
Time Investment
- Initial setup: 30 minutes (today)
- Monthly check-in: 15 minutes (to adjust as needed)
- Ongoing maintenance: Essentially zero
That’s it. Now let’s build your automated system.
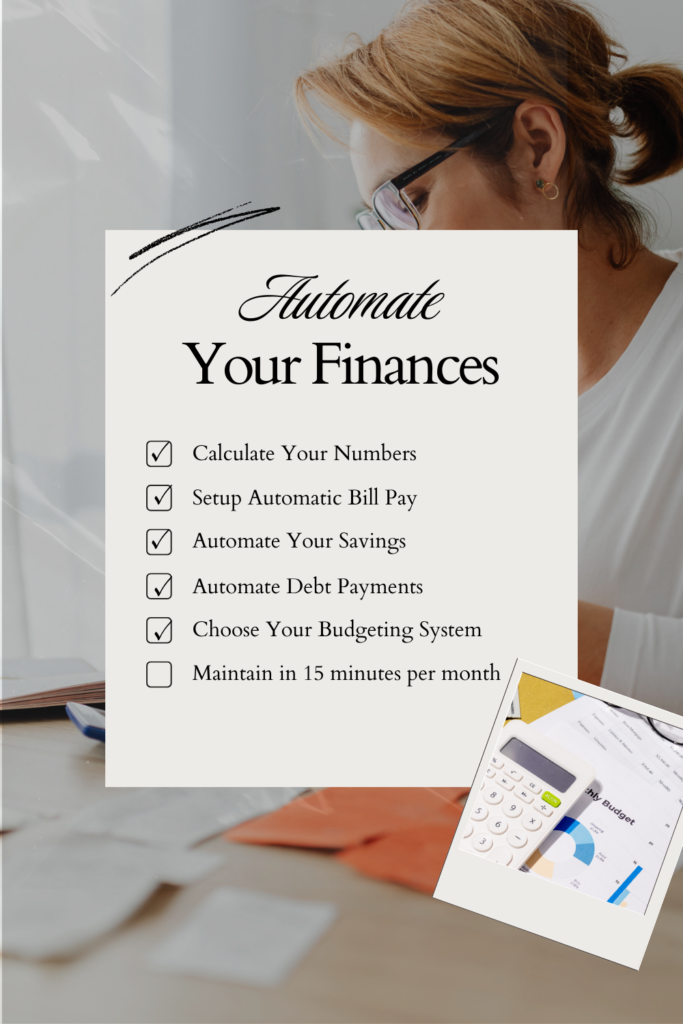
Step 1: Calculate Your Numbers (10 Minutes)
You can’t automate what you don’t understand. Start by getting clear on three numbers.
Your Monthly Take-Home Income
This is what actually hits your bank account after taxes, insurance, and retirement contributions are taken out. If your income varies (hourly work, tips, commissions), use your lowest monthly income from the past three months. This builds in a safety buffer.
Example: If you brought home $3,200, $3,850, and $3,400 in the last three months, use $3,200 as your baseline.
Your Fixed Monthly Expenses
These are bills that stay roughly the same each month:
- Rent or mortgage
- Car payment
- Insurance (car, home, health)
- Phone bill
- Internet
- Childcare
- Minimum debt payments
- Subscriptions (Netflix, gym, etc.)
Add these up. This is your “must-pay” number.
Your Variable Expenses
These change month to month but still need to be covered:
- Groceries
- Gas
- Household items
- Clothing
- Kids’ activities
- Medicine and copays
- Eating out
Look at the past 2-3 months in your bank account and calculate an average. Be honest—underestimating here just sets you up to fail.
The Leftover
Subtract your fixed and variable expenses from your take-home income. What’s left is what you can put toward savings, extra debt payments, or fun money.
If this number is negative or zero, you need to either increase income or decrease expenses before automation will work. But for most of you, even $50-100 leftover is enough to start.
Step 2: Set Up Automatic Bill Pay (10 Minutes)
Now that you know your numbers, let’s make sure bills get paid without you lifting a finger.
Option 1: Direct Auto-Pay Through Service Providers
Most companies (utilities, phone, insurance) offer automatic payments directly from your checking account or charged to a credit card.
How to set it up:
- Log into each service provider’s website
- Navigate to “Billing” or “Payment Options”
- Select “Auto-Pay” or “Automatic Payments”
- Enter your checking account or credit card information
- Choose your payment date (ideally 2-3 days after payday)
Pro tip: If you get paid biweekly, split bills between both paychecks rather than paying everything at once. This prevents the account from running dry mid-month.
Option 2: Scheduled Payments Through Your Bank
Most banks let you schedule recurring payments to any company.
How to set it up:
- Log into your bank’s online banking
- Go to “Bill Pay” or “Transfers”
- Add each payee (company name and account number)
- Set up recurring payments with dates and amounts
- Confirm and save
Bills to Keep Manual
Some bills should stay manual because they vary significantly:
- Credit cards (you want to review charges before paying)
- Medical bills (these are often one-time)
- Anything you’re actively trying to reduce or eliminate
Track Your Auto-Payments
Create a simple list of what’s on auto-pay and when it hits. Put it in your phone’s notes app or tape it inside a kitchen cabinet. This way, you’ll know when to expect money to leave your account.

Step 3: Automate Your Savings (5 Minutes)
This is where the magic happens. The golden rule of building wealth is to pay yourself first—and automation makes this effortless.
Set Up Automatic Transfers
Most banks allow you to schedule automatic transfers from checking to savings.
How to do it:
- Log into your online banking
- Navigate to “Transfers” or “Move Money”
- Set up a recurring transfer from checking to savings
- Choose the amount (even $25 per paycheck adds up)
- Schedule it for 1-2 days after payday (before you have a chance to spend it)
- Set frequency (weekly, biweekly, or monthly)
The “Start Small, Grow Later” Method
If money is tight, start with just $10-20 per paycheck. The habit matters more than the amount. Once you’ve automated savings for three months and it feels normal, increase by $10-20. Keep growing it as your income increases or expenses decrease.
Separate Savings Goals
Consider opening multiple savings accounts for different goals:
- Emergency fund (start with $1,000, eventually build to 3-6 months expenses)
- Sinking funds (planned expenses like car repairs, holidays, back-to-school)
- Big goals (vacation, house down payment, education)
Many online banks let you have multiple savings accounts with no fees. Label each one and set up separate automatic transfers. This way, you’re not just saving—you’re saving with purpose.
Where to Keep Your Savings
For money you might need within a year, use a high-yield savings account. These currently pay 4-5% interest (as of early 2025), compared to 0.01% at most traditional banks. Popular options include:
These are FDIC-insured (your money is protected) and take just 1-3 days to transfer back to checking if you need it.
Step 4: Automate Debt Payments (3 Minutes)
If you’re paying off credit cards, student loans, or other debt, automation keeps you on track—and helps you pay it off faster.
Set Up Extra Payments
Here’s the strategy:
- Keep your minimum payment on auto-pay (so you’re never late)
- Set up an additional automatic payment for extra money
- Schedule it for a few days after your first automatic payment
Example: If your minimum credit card payment is $50 and you can afford $75 total, set up two automatic payments: $50 on the due date and $25 a few days later.
The Debt Snowball Method (Automated)
If you have multiple debts:
- Make minimum payments on everything (automated)
- Put all extra money toward your smallest debt (also automated)
- When that’s paid off, redirect that entire payment to the next smallest debt
This method works because you see progress quickly, which keeps you motivated. And when it’s automated, you don’t have to think about it or resist the temptation to spend that money elsewhere.
Step 5: Choose Your Budgeting for Moms System (2 Minutes)
Now that money is flowing automatically, you need a simple way to track it. This is where budgeting for moms gets real.
Option 1: The Zero-Based Budget App
Apps like YNAB (You Need A Budget) or Monarch Money connect to your bank accounts and help you assign every dollar a job.
Pros: Gives you complete visibility and control
Cons: Requires a monthly subscription ($99-199/year)
Option 2: The Simple Spreadsheet
A basic spreadsheet can track income, expenses, and savings goals. Many are available free online.
Pros: Free and customizable
Cons: Manual entry required (though you can still automate the actual money movement)
Option 3: The Bank Account Method
This is my favorite for busy moms. It requires no app or spreadsheet—just multiple bank accounts:
- Account 1 (Checking): Where income lands and bills pay from
- Account 2 (Spending): Weekly transfer for groceries, gas, etc.
- Account 3 (Savings): Automated savings for goals
- Account 4 (Fun Money): Guilt-free spending
Once bills and savings are automated from Account 1, whatever’s left transfers automatically to Account 2. When that account is empty, you’re done spending for the week. Visual, simple, and foolproof.
Advanced Automation: Next-Level Strategies
Once your basic system is humming along, consider these upgrades.
Automate Your Emergency Fund Building
Set up automatic transfers that increase every quarter:
- Months 1-3: $25 per paycheck
- Months 4-6: $50 per paycheck
- Months 7-9: $75 per paycheck
By the end of nine months, you’ve saved approximately $900-1,800 (depending on how often you’re paid) without feeling the pinch.
Automate Irregular Expenses
Bills that hit annually or quarterly (car registration, insurance premiums) can sabotage your budget. Create sinking funds:
- Calculate the annual cost
- Divide by 12 (or 26 if paid biweekly)
- Set up automatic transfers into labeled savings accounts
- When the bill arrives, the money is already there
Example: Your car insurance is $600 twice per year ($1,200 annually). Set up a $50/month automatic transfer to “Car Insurance Savings.” When the bill arrives, you’re covered.
Automate Credit Card Rewards
If you’re disciplined (and only if), put fixed bills on a cashback credit card, set those bills to auto-pay through the card, then set the credit card to auto-pay in full from your checking account every month. You’re earning 1-5% back on money you were spending anyway.
Warning: Only do this if you never carry a balance. Interest charges will erase any rewards.
Automate Investment Contributions
Once you have 3-6 months of expenses saved, start directing some automated transfers toward retirement or investment accounts. Even $50/month grows significantly over time thanks to compound interest.

Maintaining Your Set and Forget Budget
Your automated system isn’t truly “set and forget” forever—but it’s close. Here’s your minimal maintenance plan.
Monthly 15-Minute Check-In
Once per month, review:
- Did all automatic payments go through?
- Has your income changed?
- Are your expense estimates still accurate?
- Are you meeting your savings goals?
Adjust as needed. Most months, you’ll find everything is running smoothly.
When to Update Your Automation
You’ll need to adjust when:
- Income changes (new job, raise, reduced hours)
- Major expenses appear or disappear (paid off a car, added childcare)
- Goals shift (switching from debt payoff to saving for a vacation)
- Bills increase (insurance rates go up, rent increases)
These changes take 5-10 minutes to adjust in your automation settings.
Protecting Against Overdrafts
Automation works beautifully—until you forget about an automatic payment and overdraft your account. Protect yourself:
- Keep a $100-200 buffer in checking (treat this as “zero”)
- Set up overdraft protection linking checking to savings
- Enable low-balance alerts through your bank’s app
- Keep that list of automated payments handy
Common Automation Mistakes (And How to Avoid Them)
Even the best system can trip you up. Watch out for these common pitfalls.
Mistake #1: Automating Everything on the Same Day
If all bills hit the same day, one unexpected expense can cause a domino effect of overdrafts.
Solution: Spread automated payments throughout the month or between paychecks.
Mistake #2: Forgetting About Automated Payments
You sign up for a free trial that converts to a paid subscription, or an annual service you forgot about auto-renews.
Solution: Keep a master list of all automated payments with renewal dates.
Mistake #3: Not Building in Flexibility
Life happens. Kids outgrow clothes faster than expected. The car needs new tires. Your budget breaks if it’s too rigid.
Solution: Include a “miscellaneous” or “buffer” category in your automation (even $50 helps).
Mistake #4: Setting Transfers Too High
You automate aggressive savings or debt payments, then have to transfer money back because you don’t have enough for groceries.
Solution: Start conservative. It’s better to increase automated amounts than to constantly override your system.
Your Finances: Officially on Autopilot
Let’s recap what you’ve accomplished in under 30 minutes:
✓ Calculated your real numbers (income, expenses, leftover)
✓ Set up automatic bill payments (no more late fees)
✓ Automated your savings (building wealth without thinking)
✓ Scheduled extra debt payments (getting out of debt faster)
✓ Chose a simple tracking system (staying in control without the stress)
This is what financial freedom looks like for busy moms. Not perfection. Not deprivation. Just a smart system that works while you live your life.
Your money is now flowing exactly where it needs to go, when it needs to be there. Bills are paid. Savings are growing. Debt is shrinking. And you didn’t have to add one more thing to your already overflowing plate.
Take the Next Step: Get Your Free Budget Spreadsheet
You’ve done the hard part—now let’s make tracking your automated system even easier.
I’ve created a free budget spreadsheet specifically designed for busy moms that pairs perfectly with the automation system you just built. It includes:
- Pre-formatted categories for all your expenses
- Automatic calculations (no math required)
- A debt payoff tracker
- Savings goal progress charts
- Instructions for customizing it to your family’s needs
Download your free budgeting spreadsheet today and start seeing exactly where every dollar is going—without the overwhelm.
Your automated finances are running. Your family’s future is more secure. And you’re free to focus on what matters most: showing up fully for the people you love.
Now that’s a set and forget budget worth celebrating.
Ready to automate your finances and take control of your money? Download the free budget spreadsheet and start your financial transformation today. Your future self will thank you.